Using Do Not Disturb
- Innway Support
- Innway app
- Using Do Not Disturb
Like all Bluetooth devices, your Innway’s connection can be reduced or blocked due to the environment and where it is placed. This might result in a false alarm, making your Innway and phone ring. There are certain times when you don’t want these false positives to disturb you. For example, the baby’s having a nap or you are in an important meeting.
The Innway app has a Do Not Disturb mode that suppresses separation alerts. You can still ring your phone or Innway when Do Not Disturb is enabled. The app is able to recognize trusted safe areas and situation where it does not need to ring the alarm, such as when you are at home or office where you know you won’t misplace your items.
There are four ways to enable Do Not Disturb mode.
- Global Do Not Disturb
- Quiet Hours
- Trusted Zones
- Trusted Wi-Fi networks
Global Do Not Disturb
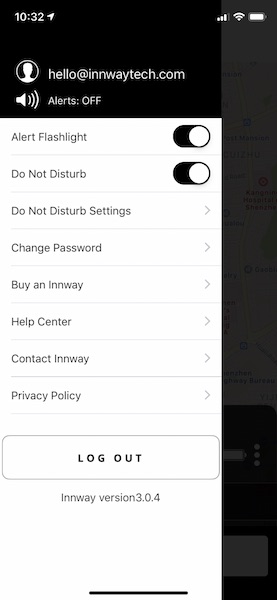
To quickly suppress all alerts, you can toggle the global Do Not Disturb option in the sidebar. This will override your other Do Not Disturb settings.
- In the Innway app, tap on the top left user icon.
- Tap on “Do Not Disturb” to enable the Do Not Disturb mode to suppress all alerts.
- You can also set the Do Not Disturb mode in the Do Not Disturb Settings screen.
Quiet Hours
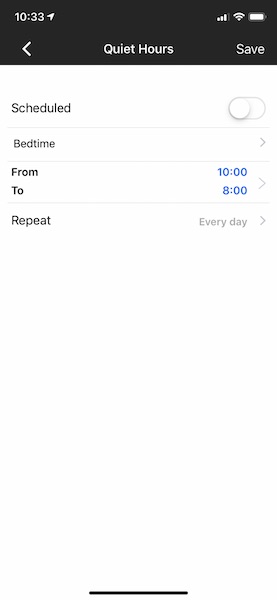
You can set Trusted Zones where your phone will automatically enable Do Not Disturb mode. You can choose time for a one-time scheduled Do Not Disturb period, or you can make it repeated on selected days of the week. You can also schedule multiple Quiet Hours periods.
Many users schedule Quiet Hours when they sleep, and we have included a “bedtime” option as the default.
- Launch the Innway app and tap on the top left user icon.
- Tap on Do Not Disturb Settings.
- Tap on schedule quite hours or you can tap on Add on the top right of the screen and then select Add Quiet Hours.
- If you wish to repeat the Quiet Hours, turn on Scheduled.
- Tap on the Name field to name this Quiet Hours to help you identify it.
- Tap on the From/To field. Set the time you want the Quiet Hours to start and end.
- Tap on Save on the top right of the screen to save your settings.
- You can tap Save to set the Quiet Hours to repeat daily.
- If you wish to customize the days the Quiet Hours repeat, tap on the Repeat field.
- In the next screen, check the days you want the Quiet Hours to repeat. Then tap on Save on the top right.
- Now you’re set to go. Don’t forget to tap Save on the top right to save your Quiet Hours setting.
- Enable Do Not Disturb on the Do Not Disturb page to enable Quiet Hours.
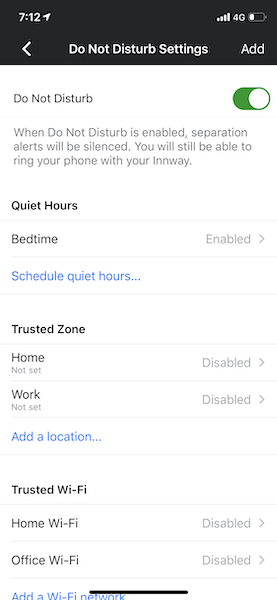


Trusted Zones
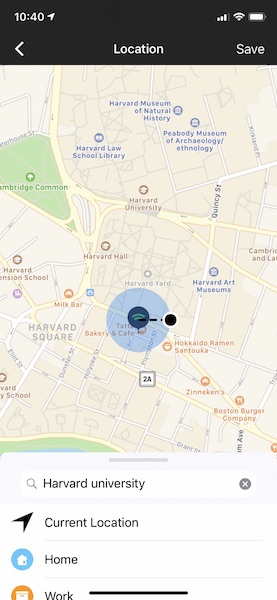
You can set Trusted Zones where your phone will automatically enable Do Not Disturb mode. You can increase or decrease the size of the Trusted Zone.
The default options are “Home” and “Work”, the two most common places where users won’t misplace their phones or Innways.
- Launch the Innway app and tap on the top left user icon.
- Tap on Do Not Disturb Settings.
- Tap on add a location or you can tap on Add on the top right of the screen and then select Add Location.
- Toggle the Enabled option.
- Tap on the Name field to name this Trusted Zone to help you identify it.
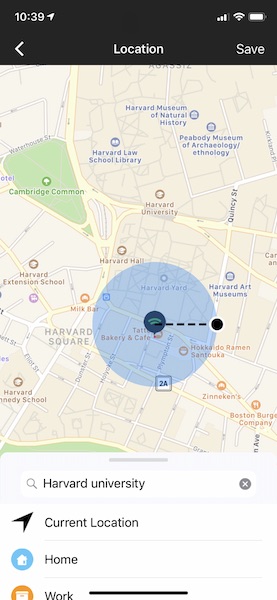
- Tap on Location. In the next screen, you can select your Current Location or search for a location. You can also use your phone’s saved locations.
- You can drag the black dot to increase or decrease the size of the Trusted Zone.
- When you’re done, tap on Save on the top right of the screen to save your settings.
- Now you’re set to go. Don’t forget to tap Save on the top right to save your Trusted Zone setting.
- Enable Do Not Disturb on the Do Not Disturb page to enable Trusted Zone.

Trusted Wi-Fi networks
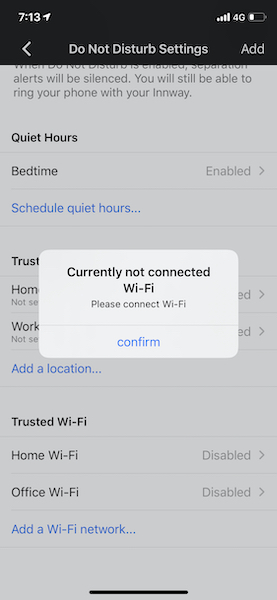
You can set Trusted Wi-Fi networks. When your phone connects to these networks, the app automatically enables Do Not Disturb mode. The app is only able to recognize a wi-fi network when your phone is connected to the network. It is unable to add an unconnected network.
The default options are “Home Wi-Fi” and “Work Wi-FI”, the two most common trusted networks.
- Ensure you are connected to the wi-fi network you wish to add as a Trusted Wi-Fi network.
- Launch the Innway app and tap on the top left user icon.
- Tap on Do Not Disturb Settings.
- Tap on add a Wi-Fi network or you can tap on Add on the top right of the screen and then select Add Wi-Fi network.
- Toggle the Enabled option.
- Tap on the Name field to name this Trusted Wi-Fi network to help you identify it.
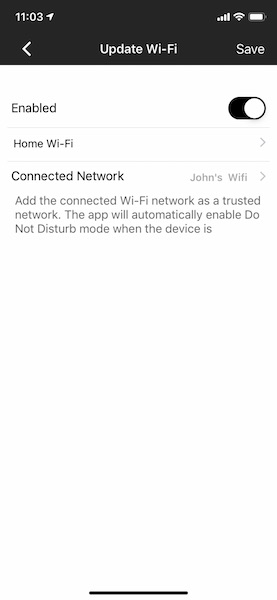
- Tap on Connected Network. In the next screen, you will see the list of Wi-Fi your phone is connected to.
- Select your preferred network. Then tap on Save on the top right of the screen to save your settings.
- Now you’re set to go. Don’t forget to tap Save on the top right to save your Trusted Wi-Fi network setting.
- Enable Do Not Disturb on the Do Not Disturb page to enable Trusted Wi-Fi network.

Quiet Hours, Trusted Zones, or Trusted Wi-Fi not working
Enabling Global Do Not Disturb mode will suppress your settings for Quiet Hours, Trusted Zones, and Trusted Wi-Fi.
Try the following troubleshooting steps to get your Do Not Disturb modes to work:
- Ensure Global Do Not Disturb mode is turned off.
- Ensure you have enabled Do Not Disturb on the Do Not Disturb page.
- Ensure you have enabled each individual settings. From the Do Not Disturb page, tap on each setting and ensure they are scheduled or enabled.
If you are still unable to resolve the issue, contact our customer support.